Start Charging in 2–8 Weeks: Townhouse EV Charger Approval to Power Roadmap
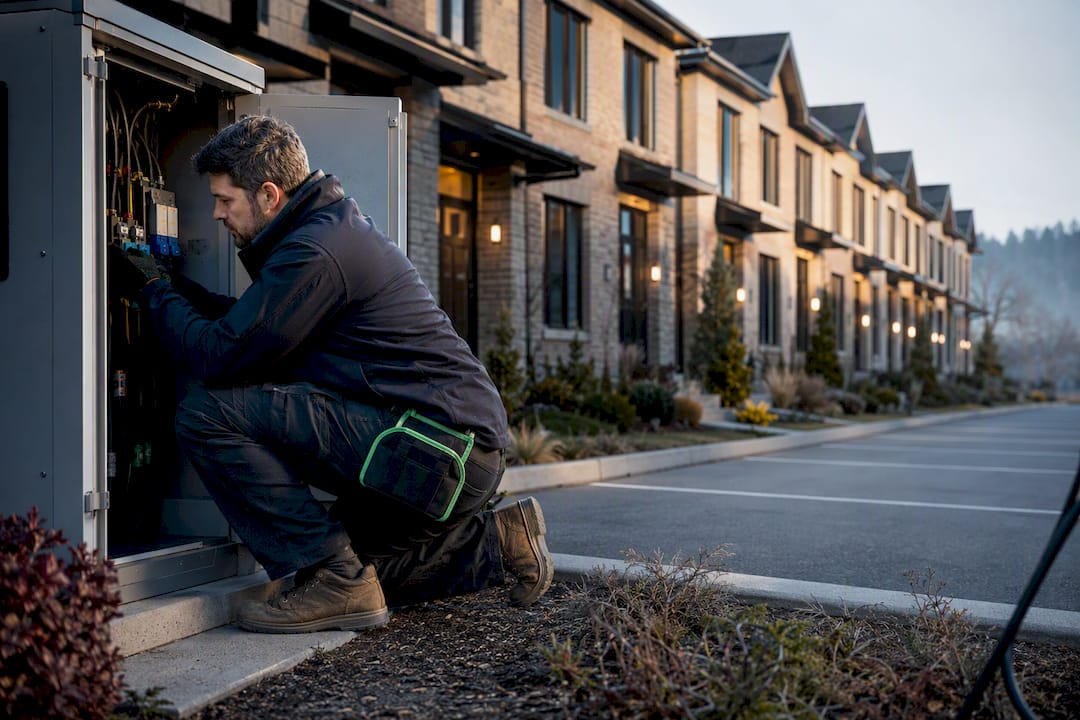
Most townhouse owners can install a Level 2 charger, provided they have an assigned or deeded parking space tied to their unit. The first move isn’t calling an electrician. It’s confirming your parking assignment on paper and contacting your strata council or property manager to start the approval process, since that timeline usually determines how fast you’re actually charging at home.
TL;DR:
- Most townhouse owners with deeded parking can install a Level 2 charger, but approval from the strata council is required before any work begins.
- A detailed request including equipment specs, diagrams, and electrician credentials speeds up approval times, which can take from two to eight weeks.
- The electrical assessment focuses on load capacity, circuit complexity, and may require submetering or a load management system if shared infrastructure is involved.
- Costs vary based on conduit length and panel access, with shorter, garage-based installs typically being cheaper and taking one to three days to physically complete.
- Using a full-service provider simplifies the process, covering site evaluation, permit filing, inspection coordination, and rebate applications, often starting from $1,800.
Table of Contents
- What are the installation steps for a townhouse EV charger?
- How do you get strata or HOA approval for a charger?
- What does the electrical assessment cover?
- How much does it cost, and how long does it take?
- How do you pick a qualified electrician and handle permits?
- What safety standards apply to townhouse charger installations?
- Does a duplex layout install differently than a multi-unit building?
- What limitations do shared panels and meters create?
- How do you maintain a townhouse EV charger long term?
- An installer’s view on what actually delays these projects
- Get a full-service quote for your townhouse charger install
- Where to check official rules before you commit
- Sources
- FAQ
What are the installation steps for a townhouse EV charger?
Getting power to your parking stall follows a fairly predictable sequence, even though every strata council handles paperwork a little differently. Skipping a step, especially the approval step, is the number one cause of delayed projects.
- Build your dossier first. Take photos of your parking stall, the electrical panel, and the route you expect conduit to travel. Note your panel’s amperage and breaker schedule, and pick a charger model with its spec sheet in hand.
- Submit a formal request to your strata council, HOA, or property manager. Include your documentation and ask when the board next meets. Many boards meet monthly, so timing your submission ahead of that cycle saves weeks.
- Book an electrical site visit. A licensed electrician will run a load calculation and decide whether mounting is straightforward or requires trenching, conduit runs, or a pedestal at a remote stall.
- Move through permitting and physical work. This covers trenching or conduit installation, wiring, mounting the charger, a municipal inspection, and, if your electrical service is changing, a utility notification.
- Apply for rebate pre-approval early, not after the work is done. Several utilities and provincial programs require pre-approval before installation begins, and missing that window can mean losing the incentive entirely, per Plugin BC’s MURB and workplace charging guidance.
Natural Resources Canada and BC Hydro both frame this as a permission-then-assessment-then-permit sequence for multi-unit buildings, and that order matters. Getting an electrician’s assessment before strata approval wastes a quote if the board asks for changes to routing or mounting location.
How do you get strata or HOA approval for a charger?
Boards approve EV charger requests far more often when the submission looks complete on the first pass. A thin, one-line email asking “can I install a charger?” almost always bounces back with follow-up questions, and every round-trip costs you another board cycle.
Include these items in your written request:
- Equipment spec sheet for the charger model you plan to install
- A single-line electrical diagram showing the proposed circuit
- A routing map showing where conduit or wiring will run
- Your electrician’s licence number and proof of liability insurance
- A proposed timeline and a restoration plan for any disturbed surfaces
Most strata corporations attach reasonable conditions: the installer must be licensed, the work must carry a municipal permit, the finished install has to be visually tidy, and you’re responsible for restoring landscaping or paving disturbed during the work. Expect the approval itself to take two to eight weeks depending on whether the board wants an engineer’s review first, according to Strata EV Ready guidance, which recommends requesting an early building-wide “EV-ready” assessment to confirm feasibility before individual owners submit requests.
Pro Tip: If your board stalls without a clear reason, ask for the specific bylaw or engineering concern in writing. Some provinces, including British Columbia, have introduced legislative language limiting unreasonable restrictions on EV charging by strata corporations, which gives you real leverage if a request is being ignored rather than reviewed.
What does the electrical assessment cover?
An electrician’s site visit isn’t just a formality before the paperwork. It determines whether your project is a straightforward afternoon job or a multi-day undertaking involving trenching and a panel upgrade.
The assessment typically covers:
- Load calculation: whether your existing panel has enough spare capacity for a dedicated 240-volt circuit without overloading the service
- Service capacity check: many older townhouses run 100-amp service, which can be tight once a Level 2 charger is added
- EVEMS as an alternative: smart load management systems can share capacity dynamically between the charger and household loads, often avoiding a full panel upgrade
- Submetering needs: if your charging draw runs through a shared building feed rather than your own meter, you may need a dedicated meter for accurate billing
- Routing complexity: a short internal run from an attached garage panel costs far less in labour than a remote assigned stall requiring buried conduit
Installation timelines from contract signing to power-on commonly run two to eight weeks, and routing distance is consistently the single biggest driver of that spread. A charger mounted three feet from your existing panel behaves nothing like one feeding a stall forty feet away with a locked utility room in between. For guidance on where to actually mount the unit for the cleanest run, see this charger placement guide.
How much does it cost, and how long does it take?
Cost bands vary widely across townhouse layouts, but the pattern is consistent: shorter runs and simpler access mean lower bills. Case studies comparing townhouse installs against condo long-run jobs show townhouses are often materially cheaper because the electrical panel usually sits closer to the parking stall, per Premium Electric’s installation case study.
- Short-run garage installs sit at the lower end of the price range, since the panel is typically a few feet from the mounting point.
- Exterior or driveway installs land in the middle band, requiring some conduit and weatherproof mounting hardware.
- Remote assigned stalls needing trenching or a pedestal push into the higher band, largely due to concrete cutting, restoration, and longer conduit runs.
Major cost drivers include trenching and concrete restoration, total conduit length, whether a service or panel upgrade is required, submetering equipment, and municipal permit fees. Physical installation work itself often takes just one to three days. The overall project, once you factor in strata approval and permit processing, usually spans two to eight weeks. Applying for rebate pre-approval before work starts avoids adding that wait on top of an already-tight schedule. A detailed local breakdown is available in this EV charger installation cost guide.
How do you pick a qualified electrician and handle permits?
Not every electrician who wires a kitchen outlet has multi-unit charger experience, and that gap shows up fast once trenching or strata coordination enters the picture.
- Verify licensing through your provincial electrical safety authority (ESA in Ontario, or the provincial equivalent) and ask for examples of completed multi-unit or strata projects.
- Request a detailed quote covering scope of work, trenching and restoration plans, conduit routing, who pulls the permit, who books the inspection, and warranty and liability insurance limits.
- Get responsibilities in writing. Confirm exactly who files the permit application, who schedules the inspection, and who contacts the utility if your service capacity is changing.
Pro Tip: Treat a vague scope of work as a red flag. If a contractor can’t name the permit office they’ll be filing with, or refuses to show proof of insurance, that’s a sign to keep looking before you sign anything.
What safety standards apply to townhouse charger installations?
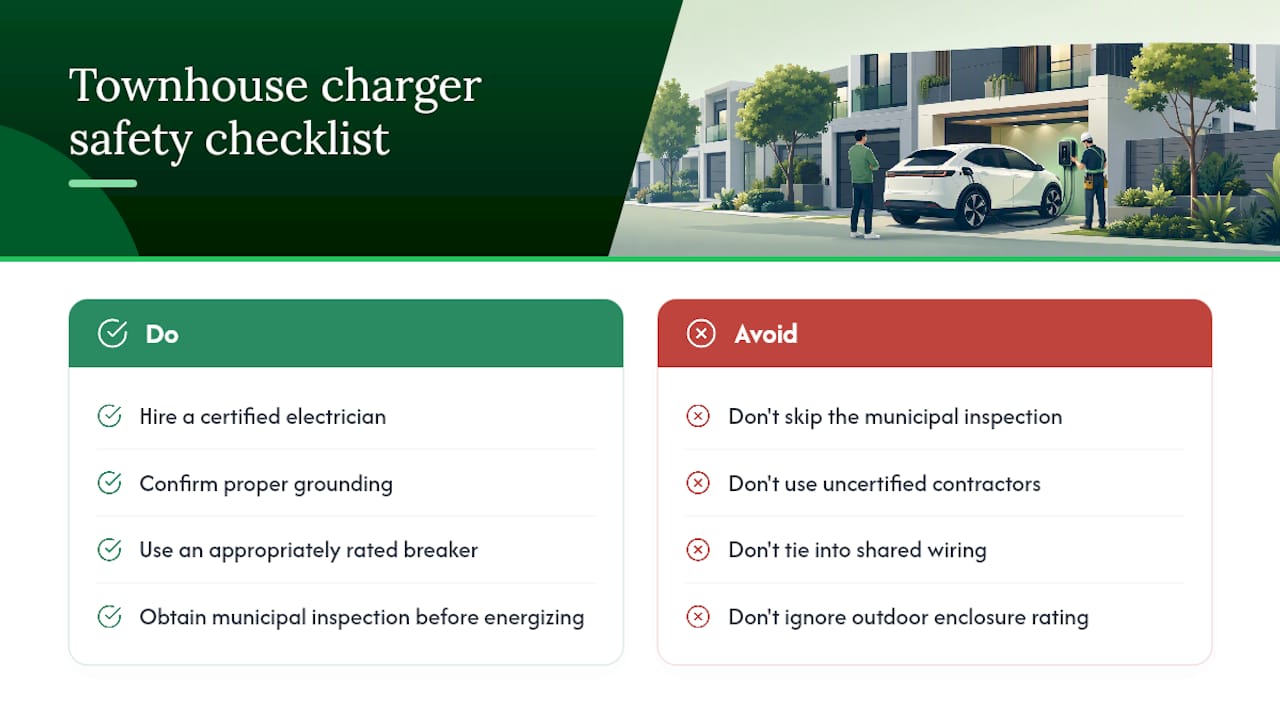
Every Level 2 installation in a townhouse setting has to meet the same electrical code requirements as a detached home, but shared infrastructure adds a layer most single-family installs never encounter. Your electrician needs to confirm that the circuit is properly grounded, protected by an appropriately rated breaker, and isolated from any shared or common-area wiring that other units might also draw from.
Natural Resources Canada recommends certified electricians specifically because 240-volt residential charging circuits carry enough current that improper installation creates real fire and shock risk, and MURB settings compound that risk when wiring runs through shared walls, ceilings, or utility rooms accessible to other residents.
Weatherproofing matters more in townhouse settings than most owners expect. Chargers mounted outdoors, on an exterior wall or at a driveway stall, need enclosures rated for outdoor exposure and mounting hardware that won’t loosen with seasonal freeze-thaw cycles common across most of Canada. If your stall sits in a covered but unheated carport, ask your electrician whether the enclosure rating still applies.
Municipal inspection is not optional, and it’s not something a contractor can skip to save time. The inspection confirms the finished work matches the permit and meets code before the circuit gets energized. Skipping it, or using a contractor who suggests skipping it, leaves you without documentation if an insurance claim or resale question ever comes up.
Does a duplex layout install differently than a multi-unit building?
Your townhouse’s electrical configuration changes almost everything about scope and cost, which is why a one-size answer rarely fits. A duplex or a townhouse with its own dedicated electrical service and panel behaves much like a detached home. The electrician works with your panel, your breaker space, and your parking stall, with no need to coordinate shared infrastructure.
A townhouse inside a larger multi-unit complex, where several units feed from a shared electrical room or a common service entrance, is a different project entirely. In that setup, your individual panel may have limited spare capacity even if the building’s overall service is large, because that capacity gets divided across every unit. Your electrician needs to check not just your panel but how the building’s main service is allocated before confirming a dedicated circuit is workable.
Stacked or back-to-back townhouse rows sometimes place panels in shared mechanical rooms rather than inside individual units. That arrangement usually means your strata or property manager controls access to the space where your new circuit originates, adding a coordination step that a standalone duplex owner never faces. It also means your restoration plan, covered in your original submission, needs to account for shared-space disruption, not just your own unit’s finishes.
What limitations do shared panels and meters create?
Shared electrical infrastructure is the single biggest wildcard in townhouse charging, and it’s worth understanding before you fall in love with a particular charger model or mounting spot.
If your building runs on a shared panel or a common feed rather than individually metered service, adding a 240-volt circuit can trigger load management requirements the building didn’t have before. Your electrician may need to install an EVEMS to prevent your charger from overloading a service that other units also depend on, rather than simply upgrading your own connection. This is often cheaper and faster than a full building-wide service upgrade, and it’s worth asking about directly through EVEMS installation options before assuming a panel upgrade is your only path.
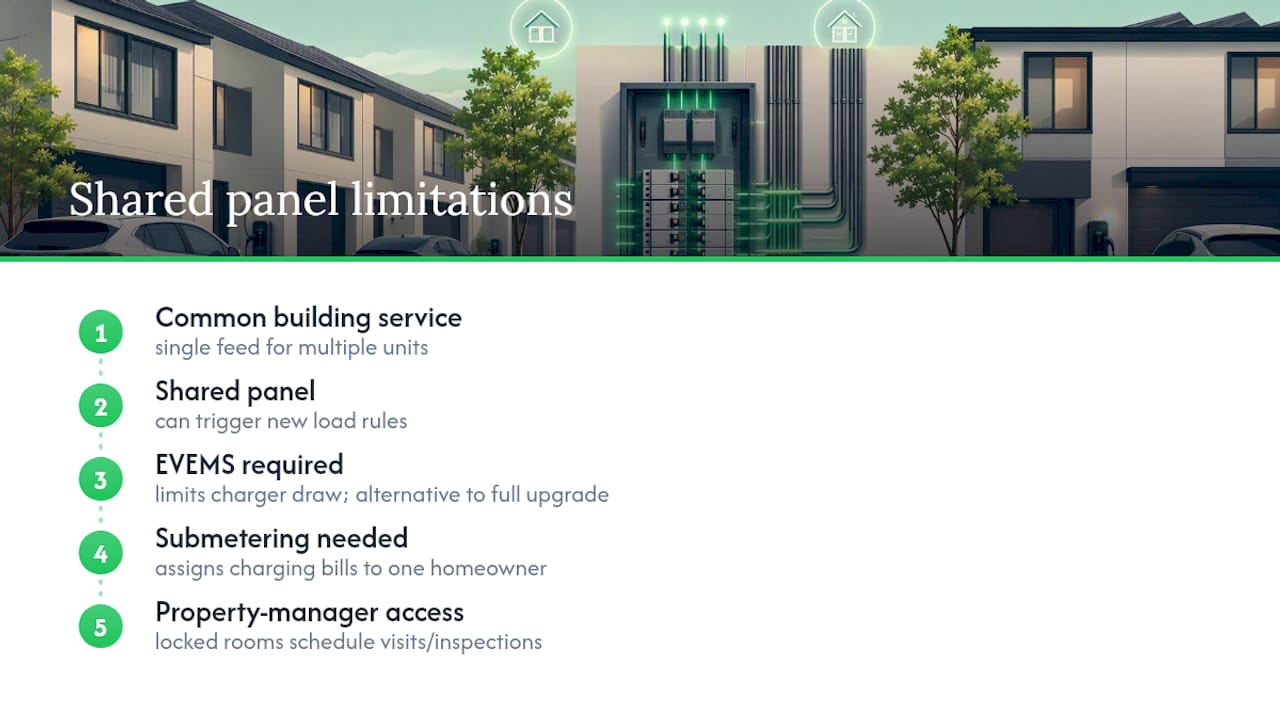
Locked utility rooms and shared mechanical spaces add a scheduling wrinkle too. If your panel or the building’s main service sits behind a door only property management can unlock, every site visit and every inspection now depends on someone else’s calendar. Build that into your expected timeline rather than treating it as a surprise delay.
Billing is the other constraint that catches owners off guard. If your charging draw runs through a shared meter rather than your own, you’ll likely need submetering hardware so your electricity use is billed to you specifically, not split across the building’s common accounts. Ask your property manager early whether submetering is already supported in your building’s infrastructure, since retrofitting it later adds both cost and time.
How do you maintain a townhouse EV charger long term?
A properly installed Level 2 charger needs very little attention, but a few habits catch problems before they become expensive.
Check the charging cable and connector for cracking, fraying, or discoloration every few months, especially if your stall is exposed to sun or road salt. Wipe down the unit’s housing periodically, and confirm the mounting hardware is still snug, since freeze-thaw cycles can loosen bolts over a season or two.
If the charger trips a breaker repeatedly, stop using that circuit and call your electrician rather than resetting it and hoping the problem clears itself. Repeated tripping usually signals either a wiring fault or a load conflict with EVEMS-managed circuits, and continuing to charge on a faulty circuit is a genuine fire risk, not just an inconvenience.
Firmware updates matter more than most owners expect for networked chargers. Many smart charger models push updates automatically, but it’s worth checking the manufacturer’s app periodically to confirm your unit is current, particularly if it’s tied into a building-wide EVEMS.
Keep your original permit and inspection documentation somewhere accessible. If you sell your unit, buyers and their lawyers increasingly ask for proof the charger was permitted and inspected, not just installed.
An installer’s view on what actually delays these projects
The surprises that derail townhouse installs are rarely dramatic. They’re small: a conduit run that hits a buried irrigation line, a “short” route that turns out to be twenty feet longer once measured properly, a strata board that tables your request for another month because a document was missing, or a charger ordered before the electrician confirmed it actually suits the panel.
Keep a short checklist before you request quotes: confirm your stall is formally assigned to your unit, photograph the panel and note its amperage, get an electrician’s site visit before finalizing your strata submission, and include a restoration plan in that submission from the start. Owners who do this rarely wait more than a few weeks longer than the minimum.
— Hafiz
Get a full-service quote for your townhouse charger install
Coordinating strata approval, an electrical assessment, permits, and a rebate application yourself is manageable, but it’s also where most delays creep in. A full-service provider can handle the entire process as one package: licensed electricians, permit filing, inspection coordination, and rebate paperwork for qualifying new EV purchases, often under transparent pricing starting from $1,800.
A typical assessment includes a site visit to check your panel and parking stall, a load calculation, a proposed routing plan, and a written quote that spells out exactly what’s included, so there are no surprise change orders once trenching starts. Most installations complete in a matter of hours once permits and strata sign-off are in place. If you’re dealing with a shared-panel building, our team can also walk you through whether an EVEMS installation makes more sense than a full panel upgrade for your specific setup.
If you’re at the early planning stage, our condo and townhouse EV charger service page covers how board approval gets handled alongside the technical work. When you’re ready to see numbers specific to your property, use our free cost calculator to get an estimate and a list of documents to prepare before your first call.
Where to check official rules before you commit
Confirm permit requirements directly through your provincial electrical safety authority, such as Technical Safety BC’s homeowner permit page, before signing a contract. Review your building’s EV-readiness through Strata EV Ready resources, and check your municipality’s permitting page early, since requirements shift by jurisdiction.
Sources
- Electric vehicle charging – Charger installation (Natural Resources Canada)
- How to install an EV charger at a multi-unit residential building (BC Hydro)
- Strata EV ready guidance
- EV charger guide (ATCO)
FAQ
How much does it cost to get an EV charger installed?
Costs depend heavily on routing distance and whether trenching or a panel upgrade is needed, with short-run garage installs sitting at the lower end and remote stalls requiring conduit work landing at the higher end. Pricing for standard installations often starts from around $1,800, though rates vary by provider and project specifics.
How much does it cost to install an EV charger in an apartment or condo building?
Multi-unit installs generally cost more than a standalone townhouse install because conduit runs are often longer and may need to cross shared spaces or locked utility rooms, adding labour and coordination time.
Can a normal electrician install an EV charger?
No. Level 2 EV charger installations require a certified or licensed electrician, since the work involves a dedicated 240-volt circuit that must meet electrical code and pass municipal inspection, as outlined in Natural Resources Canada’s charger installation guidance.
How long does a townhouse EV charger installation take from request to power-on?
Physical installation work typically takes one to three days, but the full project, including strata approval, permits, and inspection, usually spans two to eight weeks depending on how quickly your board reviews the request.
Do I need strata or HOA approval before installing a charger?
Yes, in almost all townhouse communities you need written approval from your strata council, HOA, or property manager before any electrical work begins, and submitting a complete request with diagrams and electrician credentials speeds up that review significantly.
Recommended
Get Your Free Installation Quote
Free assessment · ESA permit included · Same-week availability across the GTA